Source: Ravenous Couple
When we started this blog many years ago, pho was the last thing we wanted to blog about. It’s not because we don’t love pho—we think it’s the greatest thing on earth, even better than banh mi—but it’s synonamous with Vietnamese food with many published recipes from major media outlets as well as entire blogs and books dedicated to pho. Instead, we wanted to show readers that Vietnamese cuisine is so much more than pho and focused on home-styled com gia dinh and common folk dishes that our parents made for us growing up in America. Plus, it was our way to record our family recipes for our own use. But finally the time has finally come where we think it’s overdue to post a pho recipe on the blog, so here’s our take on it.
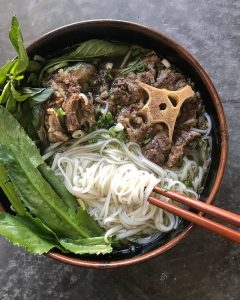
At its core, pho is beautiful amalgam of a golden fragrant beef broth, al dente rice noodles, and accent toppings. While one can argue the merits of each component and it’s relative worth, to us what makes a bowl of pho soup is unequivally, the broth. That’s what this post will focus on. This blog post is not about the origins/history of pho and we won’t even wax poetic about how a bowl of pho can cure the soul of the homesick or your worst hangover–though we’re absolutely sure it could. We won’t give you a definitive recipe, but instead, will give a guideline and magic ratio and technical tips that you can put into practice to make that perfect pot of pho for your family. It’s not a short cut, slow cooker, or pressure cooker method but it’s relatively little active time involved. Why should you believe us? Well, Hong’s grandmother was born around the time pho was invented in Nam Dinh, the birthplace of pho, and she even vended pho in the streets of Saigon in the 50’s before it got to difficult with her family life and nine children. She taught Hong’s mom who then taught her siblings, a few of whom now own several pho restaurants in America.
Before we go further, let us start by saying when we cook pho, we make enough to feed a village. About 15 quarts worth to be exact for our small family of 4. We eat what we can for several days, have friends over, and then freeze the rest in containers for 2-3 servings. We place chunks of cooked beef and oxtail in the broth to freeze as well. Even after a few months, you would be hard pressed to tell the difference between frozen broth and freshly made broth. But it’s the perfect emergency solution for our busy family. A quick defrost of our frozen pho is not much more work than cooking instant ramen.
the golden ratio
So on to the broth. First start off by asking how big is your biggest stock pot? If you’re like us, we have a 20 qt pot, we typically make 15 quarts of broth (we never do the full 20 due to volume of bones and risk of spillage). For our broth to be sufficiently beefy full flavor with good body, the golden ratio our family uses is 1:1 ratio of beef parts to quart of water. So for 10 qts of broth, we need to procure 10 lbs of beef parts—a combination of bone and meat. You don’t have to be exact, but we typically use about 8 lbs of beef femur long bones (including knuckle), oxtail, and about 2 lbs of beef brisket, shank, chuck or whatever cut of well done meat you prefer for serving with the pho. With 10 qt of broth as your final goal and 10 lbs bones and beef, you’re half way done with the recipe! The final two components are the seasoning and aromatics. For the seasoning we simply use salt, sugar, and…hold on, wait for it— a touch of MSG. Yes, you read that right. For the aromatics we use onion, ginger, and a pre-assembled spice packet containing star anise, cloves, fennel seeds, and cinnamon. There’s no need to buy all the spices separately and it comes with a handle cheese cloth to hold all the spices together.
When cooking the broth, we like to use our favorite quote from the world of bbq in mind: go low and slow. Our ideal broth should be a beautiful clear golden color. Not brown and muddled. To achieve this, never let the pot boil for an extended period of time (we do want it to come to boil at certain times). Always use the minimum heat required to keep the broth at a gentle simmer. From there it’s up to you how long you want to simmer to extract the most flavor from the bones. My parents always did this on friday night and so they simmer all night so we could have pho to eat in saturday morning. We recommend you simmer the bones for a minimum of 4 hours. As long as you keep the heat to low for a gentle simmer it’s perfectly safe to even cook the pho overnight. You’ll wake up thanking us.
key ingredients and techniques
Bones: The majority of your bones should be long femur bones with plenty of marrow. Knuckle bones often included and while they don’t have marrow, they contain cartilage that adds body to the broth so it’s a good idea to include them. We also supplement with oxtail whenever we find it on sale because it has marrow, cartilage, and meat so it packs big flavor and body. Beef neck bones are also a good cheaper alternative to oxtail as it big on beefy flavor and edible meat and much less cheaper than oxtail. But feel free to experiment and use a variety! We recommend par cooking your bones to release the scum and blood products for the clearest and cleanest flavor broth. Don’t worry about losing flavor when you toss out that par cooked liquid-the flavor you want is deep in the bones, not on the superficial surface. Rinse the bones in cold water and clean them of any loose particles and don’t forget to also clean the pot of any residue. It’s the most tedious part of making pho, but it is well worth your time. If you don’t par cook you’ll just have to spend a lot more time skimming the scum. And oh, we don’t pre-roast the bones.
Beef for serving: We prefer to use shank or brisket as our primary cooked beef for serving. Both are relative cheap cuts that are also tough and contains lots of tendon that require a long cook time to break down, but it offers big of beef flavor in return. We love the texture of shank because of the interwoven tendons that adds a nice bite when cut thin and against the grain. We strive to have well done meat, but not falling apart soft. Similarly brisket, especially the point, is well marbled and full of flavor. But chuck, sirloin, and drop flank are also good options. When these cuts of beef are done, remove from the pot and store carefully to before serving. If you’re making a small pot of broth, we would shock them in water bath and then when cool to touch, wrap tightly in plastic wrap and set aside. If you’re making a good size pot with plenty of broth to spare, remove the meat along with just enough broth to cover the meat in a bowl and set aside at room temp to cool until ready to serve.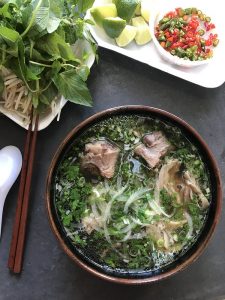 For thit tai, rare sliced beef, we prefer flank, sliced thinly against the grain on the bias, served separately on the side—pouring hot broth over the rare beef in the bowl will result in a cloudy broth.
While the “xe lua” or “dac biet” bowls are on top of every menu overloaded with every beef part imaginable, is fun to order every now and then, it’s not what we think is the ideal bowl of pho. To us, restraint is key to a great bowl of pho. One or two types of meat expertly prepared really lets you savor what you’re eating. It’s all about balance between the broth, noodles, meat, and condiments. One exception we always allow for is adding Hong’s mom’s homemade beef meatballs with tendon which is a special treat.
Seasoning: We only use salt and sugar in a 1:1 ratio. We use plain iodized salt and granulated sugar. Rock sugar is often mentioned in many recipes and fine to use, but it’s not something we always have readily available in the pantry. As for other flavor enhancers, such as MSG, we think it’s perfectly safe and acceptable to use MSG. Our mom think’s it’s absolute must and swears that pho without MSG doesn’t taste the same. But you can totally skip it if you like, after all, this will be your family pho recipe. If you plan on using MSG, we recommend using bare minimum and titrating up to your taste. What about fish sauce? While we love fish sauce to death, we do not use fish sauce to season our broth. Our family comes from Northern Vietnam in the town of Nam Dinh (near the birthplace of pho) so they are adamant about not using fish sauce to season the broth. We do however recommend having fish sauce option at the table to for each person to use as desired.
Aromatics: For convenience we prefer buying pre-assembled package “Gia Vi Nau Pho Bac” from Old Man Que Huong brand each time we make pho. It contains anise, cinnamon, fennel, clove, coriander and cardamon and a handy cotton spice bag. Storing all these spices separately may lead to poorer quality unless you cook pho very frequently. Dry toasting your spices definitely brings out the essential oils and makes a more flavorful and nuanced broth. Similarly, cooking and charring your onion and ginger will also bring out sweetness and wonderful aromas. It’s important to not just char the surface but to also slightly cook and soften the inside of the onion and ginger to bring out a more nuanced flavor. There are many ways to do this: over a low flame on a grate over a burner; broiling in the oven; or a new way we recently tried: microwaving for about 3 minutes until just slightly softened and then finishing with a blow torch or over burner for the char. We’ve seen people remove or wash off the charred bits–that’s a no no for us. You want some of that flavor and aroma in your broth.
Noodles: Unless you’re living out in the boonies somewhere almost everyone now will have access to fresh pho rice noodles sold in vacuum packed packages in the refrigerated section of your Asian market. We love how quick and easy it is to prepare use it exclusively but if you can’t find them, dried noodle are perfectly fine but just takes more time to prepare. We hate having soft mushy noodles so our technique is pour boiling water over the fresh noodles, wait about 10 seconds and then drain. It’s that simple and results in perfectly chewy yet soft noodles each time. We recommend only preparing enough noodles for what you’re going to eat in one setting.
Herbs: Like a great taco, the flavors and scent of pho is beautifully rounded out by a small squeeze of fresh lime. Plenty of finely chopped cilantro and green onions and fresh torn holy basil are also requisites for us. Bean sprouts, either fresh or blanched, adds a textural crunch and something we always add. Thinly sliced yellow onions and culantro or ngo gai is another great herb to add.
Sriracha/Hoisin Sauce: Before instinctively squirting sriracha or hoisin sauce in your bowl of pho, take a moment to taste the broth alone and savor all the work and enjoy the satisfaction of making your own home made pho.
lets do this
Ok, now that you’ve read this far, you’re stomach is tell you to make it probably eager to get started but dreading the long drawn out process. To be honest, if we were to time the active prep time for this recipe, it’ll easily fit into 30 minutes. The vast majority of the time you’re just sitting back and enjoying the aroma. The key is deciding when you want to eat your pho. If you want to eat it for dinner, start it first thing in the morning. If you want it for breakfast, start in the evening. It’s that simple there’s no reason for you not to make a pot of pho right now.
Pho Bo Guide / Tips and Techniques
ingredients:
8 lbs various beef long bones, femur, etc.
2 lbs serving meat-cut in two manageable pieces (shank, brisket, chuck or combination)
10 qt water
1 pho spice packet
1/4 cup salt
1/4 cup sugar or rocksugar
1 tbs msg optional
2 large ginger knob, charred (see above techniques)
2 large yellow onion, charred (see above techniques)
directions:
Char the ginger and onions using one of methods mentioned in the techniques section above and set aside.
In a dry pan, lightly toast the contents of the spice packet until fragrant. When cool, place spices in a cloth sachet or large tea strainer and set aside.
In place the bones in your stock pot and add enough water to cover. Bring to boil for a few minutes and empty entire contents into a clean sink. Clean the pot of any residue and rinse cold water onto the bones. When bones are safe to handle, rinse them well of any residue and small particles. Add the ginger and onions and spice packet to bottom of clean pot and place bones on top. Add the water, salt, and sugar. Keep heat on high and bring to boil. At this time you can adjust your seasoning adding more salt and sugar if necessary.
At this first boil, it’s time to add the serving meat. Since we didn’t parcook the serving meat, it will release a small amount of residue/scum so occasionally skim this off. Adding the serving meat will stop the pot from boiling so bring the pot back to boil once more and then, turn down the heat to maintain a gentle simmer. You can cover the pot while it’s simmering. Depending on the cut you use it can be up to 1-3 hrs (cuts with lots of tendon can take much longer). When the serving beef is done, store them via one of the methods outline in the above techniques section before serving.
Continue to simmer the bones for at least 4 hours, preferably longer with lid on and slightly ajar to prevent too much evaporation. If you find the water level has dropped significantly, you can more water back to the orignial level and re-season. But do not add so much as to dilute your broth.
Source: Ravenous Couple